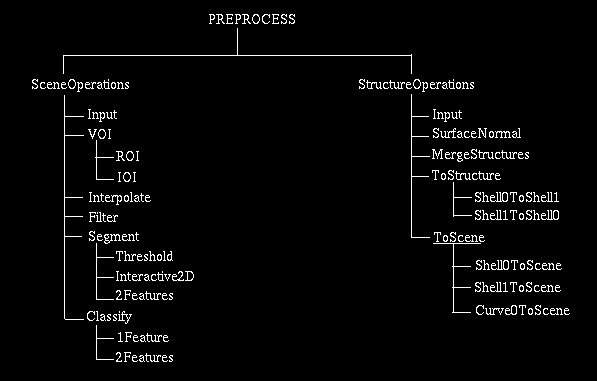
Fig 9.1: Commands under PREPROCESS.
Fig 9.1: Commands under PREPROCESS.
All VISUALIZE, MANIPULATE, and ANALYZE commands, except VISUALIZE-Slice and ANALYZE-Scene, require structure data. The main purpose of PREPROCESS commands is to allow the extraction of structure information from given scenes. Commands under SceneOperations operate on scenes and output scenes or structures and those under StructureOperations operate on structures and produce structures or scenes.
We have included an example program in Appendix A to illustrate how you
may write your own program within the 3DVIEWNIX descipline to do a
preprocessing operation.
9.1 SceneOperations
9.1.1 Summary of Commands
These commands allow various scene processing operations to be applied
to given scenes so that they are properly prepared for analysis or so
that relevant object information can be extracted from them.
Input allows selecting files of type IM0 or BIM. Segment-2Features and
Classify-2Features require two input files (of type IM0) and other
commands expect one IM0 or BIM file. VOI converts a given scene into
another scene by applying the volume-of-interest operation to the input
scene. This requires the user to specify a region-of-interest (ROI) and
an intensity-of-interest (IOI). Interpolate allows converting the given
scene (grey or binary) into another scene of any user-specified
resolution. Filter provides several choices of smoothing and enhancing
filters which can be applied to the given scene (grey or binary).
Segment allows extraction of object information. Threshold is for
creating iso-surfaces of any resolution or binary scenes of the same
resolution as input scenes from the given scene (grey or binary). This
command can be used to create structure systems. Interactive2D is a
sophisticated command that allows the user to interactively convert the
given scene (grey or binary) into another scene (grey or binary) mainly
for isolating structure regions taking as much help as is needed in a
semi-automatic fashion via painting, drawing, and live-wire tracing.
2Features allows creation of a binary scene by applying clustering based
on two features to two input scenes whose cell intensities represent the
feature values. Classify-1Feature allows the creation of non-binary
shells (of type Shell0) using one feature value from a given scene and
Classify-2Features does the same using two feature values provided as
two input scenes.
9.1.2 Common Options
In this section, we describe those options that are used by several
PREPROCESS commands.
LAYOUT: This panel option is a button which is similar in function to the command Visualize-Slice-Cycle-Layout but a shorter version. It comes with its own panel options as shown in Figure 9.2. Its main function is to allow laying out rois (regions-of-interest) of slices as determined by the user so that the result of certain scene operations such as thresholding can be examined on various parts of the input scene.
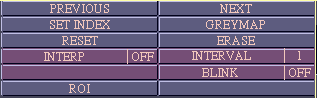
Fig 9.2: Panel Options for LAYOUT.
Upon selection of LAYOUT, the mouse button states become

and the user can select any of the panel options associated with LAYOUT.
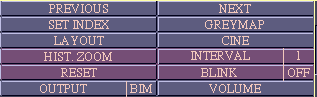
RESET sets layout to the default setting, that is, all rois previously selected and laid out are removed. XXX is a switch that determines a parameter associated with the particular scene operation. In the description, we have used the variable name XXX for this switch, but in a particular command, the name appropriate to the parameter and the operation is assigned to the switch. For example, in Threshold, the name of this switch is INTERVAL and the different states represent the different threshold intervals chosen. The operation in this case is segmentation by thresholding. BLINK is a switch whose function is described below. ROI is a button whose function is identical to that of the command Visualize-Slice-Cycle-ROI (Figure 10.9). Other options associated with LAYOUT are as described in Section 7.2
LAYOUT should be terminated by clicking the right button before other options can be selected.
CINE: While LAYOUT provides a static mode of viewing (combined with PREVIOUS, NEXT and SET INDEX), CINE helps in examining the result of a particular scene operation on the input scene in a cine mode. Its function is identical to that of the command VISUALIZE-Slice-Cycle-Display-Cine (Figure 10.10).
BLINK: This is a switch with two states, ON and OFF. In the ON state, the result of a particular scene operation, such as thresholding, is displayed as an overlay on the display of the slices of the input scene. In the OFF state, the overlay display is removed. By continuously clicking this switch (that is changing its state), it thus becomes possible to visually verify the adequacy of the result by directly relating the resultant slice to the underlying input slice.
HIST ZOOM: In some scene operations, such as thresholding, it is convenient to select the values of the parameters associated with the operation by directly interacting with a display of the histogram of the cell intensities of the slice under consideration. Often, if the region of the slice that is of interest occupies a small fraction of the region of the entire slice, cell intensity distributions in that region cannot easily be identified in the histogram. Often zooming the histogram, that is stretching in the direction of the ordinate (i.e., the frequency axis), enhances these variations. HIST ZOOM is a button which when selected sets up a scale on which the zoom factor is selected.
The default zoom factor is set to 1. It represents a histogram display
in which the maximum frequency determines the height of the histogram.
9.1.3 Commands
In this section we describe in detail the commands under
SceneOperations.
9.1.3.1 Input
This command should be used for selecting the desired IM0 and BIM files.
If the most recently selected files are appropriate, it is not necessary
to initiate this command. For details of operation, see Section 7.1.
9.1.3.2 VOI
VOI has two commands under it, ROI and IOI.
SceneOperations-VOI-ROI
This command accepts one input file of type IM0 or BIM. Its function is to allow the user to define a "rectangular" region-of-interest (roi) considering all dimensions of the input scene.
Upon selection of this command, three display areas are created in the image window. The area on the left is used for displaying slices of the input scene, that in the middle for displaying a histogram of the slice, and the area on the right for displaying the result of the ROI (and IOI) operation on the slice. The default slice is the first slice of the scene, and the default roi displayed as a rectangle on the input slice display is located at the center of the slice and is of the same size as the input slice. At all times, the display on the right shows the part of the input slice that is within the current rectangular roi and within the current intensity-of-interest (see VOI-IOI below). This rectangle can be changed in both its location and size. The picture displayed on the right is of the same size as that on the left. Hence, if the rectangular roi is smaller than the input slice, the roi image on the right gets magnified in the display. It is important to note that, in the output, the pixel size and other cell sizes are identical to those of the input scene. The selected roi location relative to the upper-left corner of the input slice and the roi size in pixels and in actual units of measurement are shown at the bottom of the picture on the left. As in other slice display commands, the slice indexes are displayed at the upper-left corner of the picture.
The state diagram associated with this command is shown in Figure 9.3. Note that the ROI and CINE options work as in other commands. When ABORT is selected in states 2 and 3, the roi and the roi picture on the right are not updated.
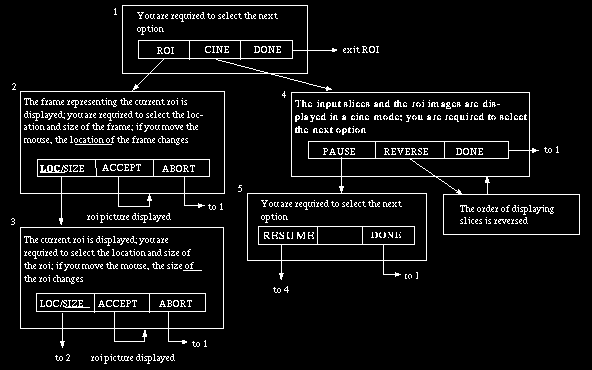 Fig 9.3: State diagram for SceneOperations-VOI-ROI. An arrow leaving a
button area indicates that that button has been clicked.
Fig 9.3: State diagram for SceneOperations-VOI-ROI. An arrow leaving a
button area indicates that that button has been clicked.
The panel options available for this command are shown in figure 9.4.
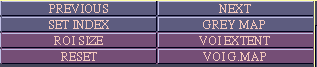
Fig 9.4: Panel Options for SceneOperations-VOI-ROI.
ROI SIZE: This option, available as a button, sets up four scales when selected called ROI WIDTH, ROI HEIGHT, ROI LOC X, ROI LOC Y. Its purpose is to allow specification of the roi by selecting its height, width, x-location and y-location on the scales rather than interactively. This is often useful when we need to create an roi of known location and size.
The default value of these parameters represent the current roi.
VOI EXTENT: This option, available as a button when selected, sets up n-2 pairs of scales for an input nD scene. The scales are for specifying the extent of the domain of the output scene in dimension 3, 4, etc. For an input dynamic 4D scene, for example, 2 pairs of scales, called DIM 3 MIN, DIM 3 MAX, DIM 4 MIN, DIM 4 MAX, are set up. The two pairs of scales are for selecting the beginning and ending slice indexes in the x_3 and x_4 direction, respectively.
The default setting for these parameters correspond to the respective values for the input scene.
RESET: This option is a button which when selected sets the current roi to the default roi.
VOI G.MAP: This option is a button which allows changing the grey map for the display of the roi picture on the right. It does not change the display of the slices of the input scene on the left. The button labelled GREY MAP should be used for the latter purpose. The reason for two separate grey maps is that the range of cell intensities for the output scene may mot be the same as for the input scene because of IOI operation (see section below).
Other panel options for VOI-ROI are as described in Sections 7.2 and 9.1.2.
ROI and IOI commands act in unison. The user can freely go from one command to the other without loosing the processing status. When all parameters for the output scene have eventually been chosen, the actual SAVE operation for output can be done in either of these commands.
SceneOperations-VOI-IOI
This command accepts one input file of type IM0 or BIM. Its function is to allow the user to define an intensity interval of interest for defining cell intensities for the output scene. If the input cell intensity falls within the specified interval, it is retained in the output scene. If it falls outside, the cell intensity in the output scene is assigned the minimum or maximum value of the interval whichever is closer to the input intensity.
The display layout is identical to that in VOI-ROI. The default intensity-of-interest (ioi) picture displayed on the right corresponds to the current roi and current ioi. The default ioi is the entire range of cell intensities of the input scene. The ioi can be changed in a manner analogous to how roi is specified (in fact, we can think of ioi as roi in the intensity dimension). The state diagram associated with this operation is illustrated in Figure 9.5. The CINE option works as in other commands. When ABORT is selected, the ioi and the ioi picture on the right are not updated.
The panel options available for IOI are similar to those in ROI and are shown in Figure 9.6.
RESET: This option is a button which when selected changes the current ioi to the default ioi.
VOI G.MAP: This option is a button which allows changing the grey map for the display of the ioi picture on the right. It does not change the display of the slices of the input scene on the left. The GREY MAP option should be used for the latter purpose. The reason for two separate grey maps it that the range of cell intensities for the output scene may not be the same as for the input scene because of the IOI operation.
Other panel options for VOI-IOI are as described in Sections 7.2 and 9.1.2.
ROI and IOI commands act in unison. The user can freely go from one command to the other without loosing the processing status. When all parameters for the output scene have eventually been chosen, the actual SAVE operation for output can be done in either of these commands.
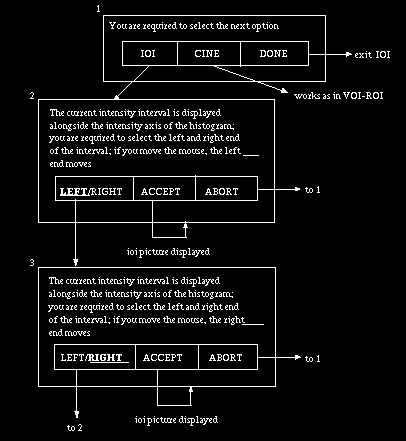
Fig 9.5: State diagram for SceneOperations-VOI-IOI. An arrow leaving a
mouse button indicates that that button has been clicked.
Fig 9.6: Panel Options for SceneOperations-VOI-IOI.
9.1.3.3 Interpolate
This command accepts one input file of type IM0 or BIM. Its function is
to create an output scene (IM0 or BIM) by interpolating the input scene
at a user-specified resolution. If the input is an IM0 file, grey-level
interpolation is done to create an output IM0 file. If the input is a
BIM file, an output BIM file is created via shape-based interpolation
of the input binary scene.
Upon selection of Interpolate, the mouse button states become:
The user is now free to select the panel options. Clicking the right button causes exit from Interpolate. A schematic line drawing illustrating stacks of slices is displayed. For the 3D case, only one stack is shown. For the 4D case a number of stacks are shown with the horizontal direction (axis) indicating the x_4 index and the vertical direction (axis) indicating the x_3 index. The axes are marked to indicate the slice location in the 3rd and 4th dimension. The purpose of this schematic drawing is to give a quick picture of the arrangement of the slices to the user.
The panel options available for Interpolate are shown in Figure 9.7.

Fig 9.7: Panel Options for SceneOperations-Interpolate.
DIM, MODE: These are both switches used for specifying the type of interpolating function to be used in the various dimensions. DIM has as many states as the dimensionality of the input scene. The states are labelled x_1, x_2, . . . . MODE has three states: N.N, LINR, CUBIC. These represent respectively nearest-neighbor, linear, and cubic forms of interpolation. Any form of interpolation can be chosen for each dimension. CUBIC produces the smoothest interpolations of the three forms, but in this state, the interpolation process is the slowest. N.N produces rough interpolations but the process is the fastest of three modes. LINR has intermediate behavior on both accounts.
The default setting is N.N for all dimensions. The users should experimentally determine the mode that is most appropriate to their application from both speed and accuracy considerations.
RESOLN works as described in Section 7.2.
The resolution of the output seen can be coarser or finer in each
dimension than the resolution of the input scene for both grey-level and
shape-based interpolation. When higher resolutions are chosen,
especially for 4D scenes, very large data sets are created. Disk space
to store the output file may become a problem. So, this option should be
exercised with care.
9.1.3.4 Filter
This command accepts one IM0 or BIM file as input, and in both cases,
produces an IM0 file as output. Its function is to apply to the input
scene one of several smoothing and enhancing filters available and
produce an output scene.
Upon selection of Filter, a display is created, on the left side of the image window, of a slice of the input scene. The default slice is the very first slice of the scene. Both the size and location of this displayed picture can be subsequently changed using a panel option called LAYOUT. The mouse button states associated with this command are as in Figure 9.8.
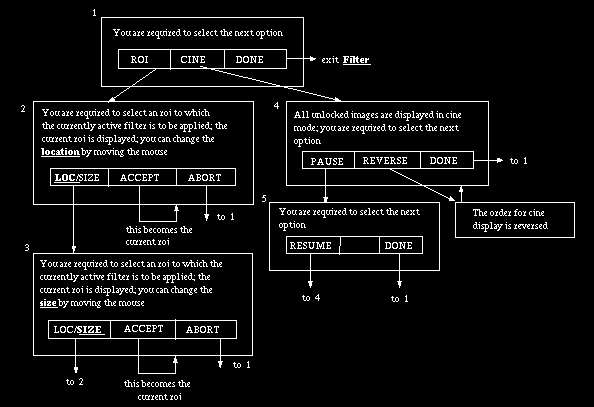
Fig 9.8: State diagram associated with SceneOperations-Filter. An arrow
leaving a mouse button indicates that that button is clicked.
There is always a filter that is active. This can be changed via the switch TYPE. The filtered images can be deposited anywhere within the image window by the user. The mouse button option ROI just defines the region of the input slice that will be filtered and shown. However, when an output is created via SAVE button, the filtering operation is applied to the entire scene. Different filtered images displayed in the image window may have different filters associated with them. In the cine mode of display in state 4 of Figure 9.8, the filtered images are displayed by applying the correct associated filters. The panel options associated with this command are shown in Figure 9.9.
Fig 9.9: Panel Options for SceneOperations-Filter.
LAYOUT: This is a button whose function is to alter the layout (location and size) of the images in the image window. It works as the VISUALIZE-Slice-Cycle-LayOut command. This option is applicable to even the display of the input slices. It should be terminated by clicking the right button before other options can be selected.
RESET: This option is a button which when selected sets the current filter to the default (GAUSS2D) and the parameters of all filters to their default values. This does not change the current roi.
FILTER: This option is a button which actually does the filtering operation. The type of the filtering operation is determined by the current state of the switch TYPE. When FILTER is selected, a rectangular frame representing the frame of the picture of the filtered image appears in the image window just above the panel area. It can be deposited at any location in the image window at any size as per the states (2, 3) associated with the ROI option of Figure 9.8. When the frame is eventually deposited by clicking the middle button (ACCEPT), the result of the filter operation by the current filter as applied to the current roi is displayed within the frame. By changing the filter type and/or roi and laying out the results at various locations, the effectiveness of the filters can be assessed and the filter most appropriate to the given application can be chosen.
This option should be terminated by clicking the right button before other options can be selected.
TYPE: This is a switch with five states at present. These are called GAUSS2D (default type), GAUSS3D, GRAD, SOBEL, TOBOG, NONE. GAUSS2D is a 2D Gaussian smoothing filter. It creates the filtered image by essentially weighted averaging of the cell intensities within a 33 neighborhood within the slice for every cell. The weights given are determined by a 2D Gaussian function. The weights can be controlled by changing the standard deviation of the function selectable on a scale that is set up when this type is chosen. GAUSS3D is also a smoothing filter that uses a Gaussian function, but in 3D, using a 333 neighborhood. Its standard deviation is also selectable on a scale. Larger values in both cases result in greater smoothing effect. GRAD is an enhancing filter which assigns to a cell in the output scene gradient magnitude computed within a 333 neighborhood of every cell. SOBEL is also an enhancing filter which uses the Sobel operator within a 33 neighborhood to compute gradient magnitude. TOBOG is an enhancing filter which uses an operation called "tobogganing" to enhance the input slice. It sharpens region boundaries by pooling together nearby regions that have more-or-less the same cell intensity distribution. NONE is an identity filter; that is, it does not change the input cell intensities.
The users should experiment and determine the filter that is most appropriate to their application at hand. There are no universally applicable prescriptions. Often it is useful to filter binary scenes so as to smooth the boundaries represented in the binary scene.
REDISPLAY: This option is a button which when selected redisplays all images. The purpose of this is to clear any side effects of the ERASE option that may be left over.
OUT G.MAP: This is a button which allows changing the grey map of the filtered images. Since the range of cell intensities of the filtered images may be different from those of the input slice, this option applies only to the filtered images. GREY MAP should be used for changing the grey map of the input slice display.
The remaining panel options work as described in Sections 7.2 and 9.1.2.
9.1.3.5 Segment
The commands under Segment allow segmentation of input scenes into
binary scenes as well as creation of object information in the form of a
structure system. The following commands are available: Threshold,
Interactive2D, and 2Features.
SceneOperations-Segment-Threshold
This command accepts one IM0 or BIM file as input and produces one or more output files of type BIM, BS0, or BS1.
When the input is an IM0 file, BIM files can be output via thresholding. Several threshold intervals can be specified, for each of which a BIM file can be created. The cell size in the output binary scenes is the same as the cell size in the input grey scene. Alternatively, for each specified threshold interval, binary shells of type Shell0 or Shell1 can be created representing boundary surfaces satisfying the threshold interval criteria, in which case the outputs are BS0 or BS1 files. It is also possible to create connected, oriented surfaces represented as binary shells of type Shell0 or Shell1. A structure system can be built by creating and collecting several structures in a single file and by specifying the parameter vector associated with each structure. In all these cases the outputs are files of type BS0 or BS1 and the resolution of the output structures can be greater than, equal to, or smaller than the resolution of the input scene.
When the input is a BIM file, the thresholding operation is trivial. However, the creation of BS0 or BS1 files as described above at any desired resolution of the output structures or structure systems is perfectly legitimate.
Upon selection of Threshold, three display areas are created in the image window. The area on the left is used for displaying the slices of the input scene, the default slice displayed being the first slice. The area in the middle displays a histogram of cell intensities of the current slice. The area on the right displays a binary picture which is the result of applying the current threshold interval to the current slice. The current threshold interval is selected via the panel option (switch) INTERVAL. Several intervals (up to 4) can be specified, all of which have a default empty setting. Therefore, the binary picture on the right is initially all 0's. The intervals can be changed interactively. The current interval is always displayed under the histogram display alongside its intensity axis. The mouse button states associated with the Threshold command are shown in Figure 9.10.
As in other slice display commands, the slice indexes are displayed at the upper-left corner of the slice display. Whenever an interval is eventually accepted (in states 2 and 3), the binary slice resulting by applying the thresholding operation using that interval is displayed on the right. If the interval that is being modified is eventually not selected (but aborted in states 2 and 3), the most recently accepted range for that interval is reinstated. When a point is selected near a boundary of interest (in state 1), it is stored, its location information (x, y coordinates relative to the upper-left corner of the slice) is displayed in the dialog window, and a mark is made on the picture on the left to indicate the location of the point. Each point is used for detecting a connected 3D boundary starting from a boundary element found in the vicinity of the point. The SELECT BNDRY option in state 1 is useful only if connected boundaries are to be found and output as Shell0 or Shell1 structures. It is not needed if the desired output is a binary scene.
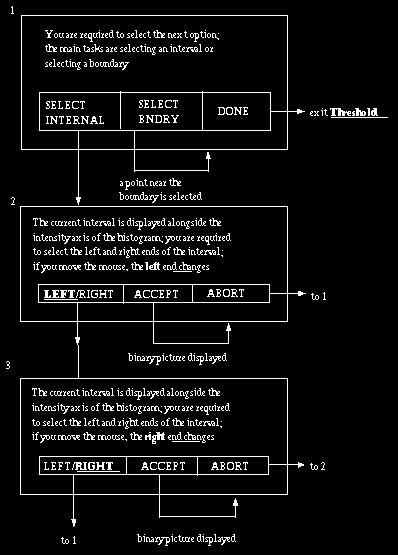
Fig 9.10: State diagram for SceneOperations-Segment-Threshold. An arrow
leaving a mouse button indicates that that button has been clicked.
The panel options available under Threshold are shown in Figures 9.11a-c. Several additional parameters need to be specified when creating a structure system compared to when a binary scene is created. The additional panel options in Figure 9.11b and c are for this purpose.
 (a)
(a)
 (b)
(b)
 (c)
(c)
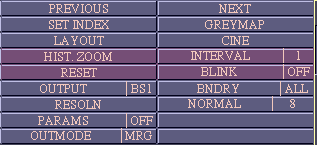
Fig 9.11: Panel options for Threshold: (a) the state of switch OUTPUT is
BIM (for creating binary scenes) (b), (c) the state of switch OUTPUT is BS0
or BS1 (for creating structures).
CINE: This is a button which allows displaying in a cine mode the input slices as well as the slices of the binary scene resulting from applying the current threshold interval. Its operation is as in other commands that require slice display, for example, in SceneOperations-VOI-ROI (see Figure 9.5).
INTERVAL: This option is a switch with five states called 1, 2, 3 and 4, and ALL, the default being 1. The purpose of this switch is to select a particular interval for the threshold operation to eventually create a BIM file or a BS1 or BS0 file. The extent of the intervals is actually defined by first selecting the interval on this switch and subsequently using the mouse button option SELECT INTERVAL as illustrated in Figure 9.10. If this interval has been previously changed, when the interval is selected on this switch, its extent is displayed under the histogram. Each interval is assigned a fixed color to indicate the possibility that the interval may be used for defining a particular object, a tissue type, or a material type. The resultant binary images are displayed in the color assigned to the interval. When the state of this switch is ALL, all intervals are considered. That is, the binary image created has a cell intensity 1 only if the corresponding cell's intensity in the input scene is in any one of the intervals.
The default setting of the intervals is empty. In state ALL of this switch, creation of BS1 and BS0 files is not permitted at present.
RESET: This is a button whose function is to reset the intervals to their default setting namely empty. When this option is selected, the binary image displayed on the right becomes empty, that is, it will have only 0-cells.
OUTPUT: This option is a switch which sets up the type of data that is to be output. It has three states: BIM, BS1, and BS0. The states represent , respectively, binary scene, binary Shell1 and binary Shell0 data types. The default setting of this switch is BIM.
BNDRY: This is a switch with two states, ALL and CON. When its state is ALL, all shell elements (of type determined by the state of the panel switch OUTPUT) in the input scene domain that satisfy the current threshold interval (selected by the switch INTERVAL) are considered to form a structure. If the input is a 3D scene, in this state, only one object is generated per interval for the interval shown in the OUTPUT switch (of the mouse window) when SAVE is selected. If the input is a 4D scene, one object is generated for the interval shown in the OUTPUT switch for each instant of the fourth dimension. When the state is CON, all shell elements (of type determined by the state of the panel switch OUTPUT) connected to the initial shell element specified using the SELECT BNDRY mouse button option (see Figure 9.10) and that satisfy the current threshold interval are considered to form a structure . Irrespective of whether the input is a 3D or a 4D scene, in this state, the structures detected using all starting points are considered to form one object for the interval shown in the OUTPUT switch (of the mouse window) when SAVE is selected. For the 4D case, the instant of the fourth dimension for which this detection is done is the current instant chosen via SET INDEX.
NORMAL: This is a switch with two states, 8 and 26. The two states represent two different methods of estimating surface normal. The state called 8 uses eight neighboring cell intensities in the input scene to determine surface normal at a point and the other uses 26 neighboring cell intensities. The latter usually gives smoother looking surface renditions of the structures than the former .
PARAMS: This is a switch with two states ON and OFF. In the OFF state, you will not be able to define the values of the parameter vectors associated with different objects. If you output more than one structure to the same file, they will all be treated as different objects (even though some of them may constitute a manifestation of the same object at different time instances). To be able to correctly define parameter vectors, this switch should be in ON state. Its default state is OFF.
# PARAMS: This option is a switch which allows selecting the number of elements needed in the parameter vectors that will be associated with the structure system to be created. Its default value is 1.
SET PARAM: This is a button which allows defining the values of the individual elements of the parameter vector to be associated with a structure that is being created. When the option is selected, a subpanel is set up as shown in Figure 9.11c and several tablets equal in number to the number of elements selected via the switch # PARAMS are set up in the dialog window. Each of these tablets has a name that is determined by the states of the switches PARAM and TYPE and default values which the user can modify.
PARAM, TYPE: These are both switches which together allow defining what each of the parameter should be. The number of states for PARAM is the number selected on the switch # PARAMS. The states of PARAM are: 1, 2, . . . . TYPE has five states: OBJ (for object), TIME, LTIME (for longitudinal time), MOD (for modality), and OTH (for other). The default setting is such that PARAM 1 corresponds to OBJ, PARAM 2 to TIME, PARAM 3 to LTIME, PARAM 4 to MOD and PARAM 5 to OTH.
VOL: This is a switch with as many states as there are instances of the fourth dimension in a 4D scene. This option is made available only when the input is a 4D scene. Its purpose is to define the instance of the 4th dimension corresponding to which the parameter vectors have to be defined for structures detected in the corresponding 3D subscene. When you are building a structure system for a dynamic 4D scene, for example, this switch can be used to select the time instance for which the structures and their parameter vectors are to be defined.
OUTMODE: This is a switch with two states called MRG and NEW. Its purpose is to indicate to the SAVE option in the mouse window whether the structure currently defined is to be added (state MRG) to the current structure system being built in the output file or it should be a structure in a new (state NEW) structure system. Its default state is NEW.
RESET PTS: This option is a button, which when selected removes all points that have been specified via the mouse button option SELECT BNDRY (see Figure 9.10). It appears in the panel only when the panel switch BNDRY is in state CON.
The remaining panel options work as described in Sections 7.2 and 9.1.2.
The OUTPUT switch in the mouse window is assigned n states where n is the number of nonempty intervals selected plus 1 (for ALL). These states are called INT1, INT2, . . . . ,ALL. This switch is set up in such a way that it is possible to determine all processing parameters in advance, and do the output operation at the end. When BNDRY is in state CON, all points selected via the mouse button option SELECT BNDRY when INTERVAL is in a particular state are associated with that interval. When OUTPUT of mouse window is set to a particular interval, all points associated with that interval are considered for detecting structures.
To illustrate how the various panel options can be used to create the desired output, we give two examples.
Creation of binary scenes is rather straightforward. To create, say, two binary scenes, one for each of two intervals, first set INTERVAL to 1, and select an appropriate interval as per Figure 9.10, and verify the adequacy of this interval by examining the binary picture for a few slices. Use PREVIOUS/NEXT or CINE or the BLINK ON mode or LAYOUT. Then set INTERVAL to 2 and similarly adjust the interval to get appropriate segmentation result. Finally set the panel switch OUTPUT to BIM, set the switch OUTPUT in the mouse window to INT1 and switch RUN-MODE to BG and select SAVE to initiate the output operation. Since the output operation is done in the background mode, you can immediately initiate the second output by setting OUTPUT to INT2 and selecting SAVE again. When the background processes are completed, two binary scenes will have been created.
The second example is to create a structure system from an input 4D scene. Suppose that the fourth dimension corresponds to time with 8 instants and that there are two objects, the first consisting of two connected structures and the second consisting of one connected structure and that the parameter vectors of the structure system consist of two parameters, object and time instant. The following actions will build the desired structure system: SET INTERVAL to any state but ALL. Select the first time instant using SET INDEX. Select an appropriate threshold interval. Set panel switch OUTPUT to BS1 and BNDRY to CON. Choose an appropriate resolution via RESOLN. Set PARAMS to ON, select SET PARAM and subsequently set #PARAMS to 2, PARAM 1 to TYPE OBJ, PARAM 2 to TYPE TIME, OUTMODE to MRG, and VOL to 1. Using SET PARAM, set the entries for the first parameter vector appropriately. Specify two starting points for detecting the two structures of Object #1 using the SELECT BNDRY option. Make sure that the state of OUTPUT in the mouse window shows the same interval as that used for selecting the threshold interval. Now select SAVE. This will initiate detection of the two structures. When this is completed, select all parameters to appropriately specify the third structure representing Object #2 of the first time instant and select SAVE. This will complete building of the structure system for one time instant. This procedure should be repeated for the remaining 7 time instants. The structure system consisting of 24 structures (3 structures for each of 8 time instants) will be created in the file whose name appears in the tablet associated with OUTPUT.
In the last example, if we had set BNDRY to ALL, all boundary elements satisfying a given threshold interval would have been considered as forming one object. When SAVE is selected, one object per time instance is detected for all time instances. If you wish to change the default values of the parameter vectors, you should use SET PARAM and the associated options to modify these values prior to selecting SAVE.
It should be clear to the user now that there are numerous ways in which a variety of structure systems can be created using the Threshold command.
SceneOperations-Segment-Interactive2D
This command accepts one IM0 file as input and produces one or more output files of type BIM or IM0.
Its purpose is to allow the user to interactively segment multidimensional scenes. Interaction is essentially in a slice-by-slice form, hence the name of the command. It is a very sophisticated command which allows specification of subregions in each slice via drawing, painting, and automatic tracing, and combinations of these actions. These are always under user control. By these actions, the user essentially specifies one or more objects. The objects specified may be output as binary scenes, one binary scene per object or one binary scene for all objects. In the former case, the set of all 1-cells in the binary scene is considered to represent an object. In the latter case, differentiation among objects may be lost and the 1-cells simply indicate that they belong to some objects among those specified. It is also possible to output subregions specified as scenes, one scene per object or one scene for all objects. In the former case, the scene comprises of cells that are in the specified object regions with assigned intensity values identical to those of the corresponding cells in the input scene and of cells that are not in the specified object regions with an assigned fixed intensity value of 0. In the latter case, those cells that are in some object regions are assigned intensity values identical to those of the corresponding cells in the input scene and those cells that are not in any specified object regions are assigned a fixed intensity value of 0. It should be noted that, in all output situations, the output scene domain is identical to the domain of the input scene.
Interactive2D offers four modes of operation: manual, paint, live, and training. In the manual mode, specification of object regions is entirely by manually tracing object boundary contours. In paint mode, object region specification is still manual but done via a painting action. Brushes of different sizes can be chosen for this purpose. In live mode, object specification is via live-wire tracing of boundary contours semi-automatically under user control . In training mode, actual object specification is not done, but it helps in making educated guesses of the values of some of the parameters used in the live-wire tracing process. It is important to bear in mind that mixing of modes is perfectly legitimate and the user should use a combination that is most appropriate to the situation.
Upon selection of Interactive2D, two displays are created in the image window, one on the left and the other on the right, both of the same slice in the input scene. The indexes of the slice are displayed at the upper left corner above the picture on the left. These indexes are shown as (i_n, . . . . , i_1), where i_1, . . . . , i_n are the first to nth indexes of the slice. Under this is displayed the scale factor of magnification as sf = x. This number indicates how many screen pixels correspond to one pixel in the input slice.
Often colored semi-transparent regions are overlaid on the two displays. The overlay for the picture on the left indicates the "mask" region currently used for the current slice. A mask is simply a set of pixels, in other words a region within the slice, to which segmentation is confined. Often, especially in live-wire tracing, the chances of automatic contour detection become greater as we restrict the region in which automatic detection is attempted to fewer pixels in the vicinity of the alleged boundary. The current mask displayed over the picture on the left thus indicates the active area of segmentation. The default mask is the entire slice region. Therefore, unless a mask is explicitly specified, you will see a colored translucent overlay on the entire slice in the display on the left.
The overlay for the picture on the right indicates the regions corresponding to the current object that are specified for the current slice.
When Interactive2D is terminated, information about objects specified so far for the current input scene is saved in a temporary file called "objects.TMP" in the working directory. As long as this file is not tampered with, you will be able to continue segmentation of the same scene after a break from where you left. This arrangement is helpful since interactive segmentation, especially of 4D scenes, is time-consuming. It is important to note, however, that if another person used the same working directory for carrying out segmentation via Interactive2D, after you took a break, the partial results of your segmentation work may be lost at the time you wish to resume the work. At the time of entry into Interactive2D, the most recent segmentation situation is restored by displaying the appropriate slice and the object regions if the current input file was the input file for the most recent segmentation session.
Manual Mode
In this mode, object specification is via the boundaries traced by the user. The default mode of object specification is always the manual mode. The current mode is indicated by the state of the panel switch called MODE. In this mode, the mouse button states and the associated boundary tracing process proceed as illustrated in Figure 9.12. The actual tracing may be done on the picture on the left or on the right. However, because of the translucent mask display on the left, it is more convenient to do most of the tracing operations on the right. In state 2, the curve can be drawn in a continuous fashion (without selecting successive points for a piecewise linear approximation) by holding the left button depressed while moving the mouse. A complement of this action for erasure is allowed in state 3 by holding the middle button depressed and moving the mouse. There is no restriction on the number of regions that can be specified for the current object whose number is indicated by the panel switch OBJECT.

Fig 9.12: State diagram for manual mode of object specification in
Interactive2D. An arrow leaving a mouse button area indicates that that
button is clicked.
In this mode, the boundaries specified for any given object can contain one another. For example, an annulus can be identified by two boundaries, one inside the other, both representing the same object. The way to handle this situation is to draw the two boundaries first and then select CUT in state 1 of Figure 9.12. Structures and structure systems created with this arrangement can be visualized, manipulated and analyzed freely without any restrictions.
The panel options associated with the manual mode are shown in Figure Fig 9.13 and are described below.
PREVIOUS, NEXT, SET INDEX, and GREY MAP have already been described in Section 7.2.
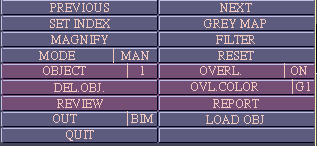
Fig 9.13: Panel Options for Interactive2D, Manual Mode.
MAGNIFY: This option is implemented as a button. Its purpose is to magnify the display of the slice in the two pictures. Its operation is illustrated in Figure 9.14. Effectively, you should specify an roi within either of the displays which is subsequently magnified appropriately to fill in the entire frame of the display. The effect of MAGNIFY can be neutralized by selecting the option RESET.
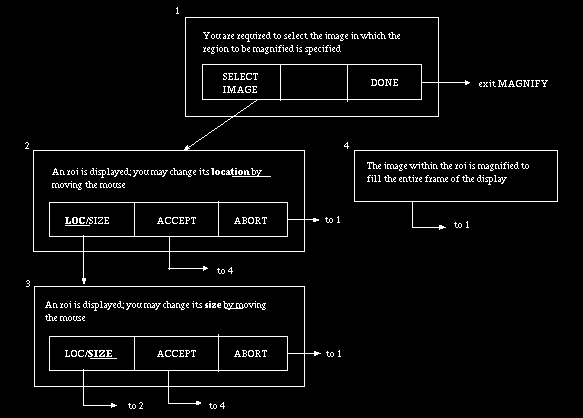
Fig 9.14: State Diagram for MAGNIFY Option in Interactive2D. An arrow
leaving a mouse button area indicates that that button has been clicked.
FILTER: This option, implemented as a button, effects a low-pass filtering operation on the current slice when selected. The filtered image is displayed on the left and on the right. Any subsequent operation on the current slice, such as live-wire tracing and the associated computations, are carried out on the filtered slice. Filtering can be done repeatedly by repeated selection of this option. The original slice can be restored via the option RESET. The filtering kernel is a 2D 33 operator. This operation often makes boundaries detected via live-wire tracing smoother than when filtering is not used.
MODE: This is a switch with four states called PAINT, MAN, LIVE, and TRAIN. PAINT, MAN, and LIVE allow object specification in the painting, manual, and live-wire tracing mode, respectively. The TRAIN mode allows choosing parameters for live-wire tracing.
OBJECT: This is a switch with nine states called 1, 2, . . . . , 8, and ALL. Each of the numbered states allows specifying or displaying regions corresponding to the particular object. In state ALL, specification is meaningless, but all regions corresponding to all objects that have been already specified are displayed . This is an important switch since all operations performed are in reference to the object specified by it.
OVERL: This is a switch with two states ON and OFF. In all modes, while actually specifying an object, this switch should be set to ON. Sometimes it is helpful to view the underlying slice without the overlying mask or object specifications. The OFF state is for such situations. Also by toggling between the ON and OFF states, the appropriateness of specified regions can be verified.
OVL.COLOR: This is a switch with nine states called G1, G2, G3, R1, R2, R3, Y1, Y2, and Y3. These states represent nine different colors, three each in green, red, and yellow, used for the translucent overlay. You may set the color that is most convenient for you by way of showing the mask or object region and at the same time revealing the underlying image.
DEL OBJ: This is a button which upon selection removes from the file objects.TMP regions specified for the object indicated by the switch OBJECT for the current slice. This also causes removal of the object regions in the current display.
LOAD OBJ: This is a button which upon selection displays from the file objects.TMP regions specified for the object indicated by the switch OBJECT for the current slice. Whenever in doubt as to what has already been specified for a particular object on the current slice, simply select LOAD OBJ. In going from slice to slice verifying what has already been specified, you should select LOAD OBJ explicitly.
REPORT: The purpose of this button is to provide a summary report of what has been specified so far. The summary appears in the image window as shown below after removing the displays of the current slice. We have assumed a 4D scene to be the input scene.
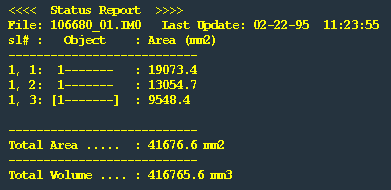
The column labelled Sl# lists the indexes of those slices for which objects have been specified. In the illustration, for the 6th slice of the 2nd volume, Objects 1 and 3 have been specified, the area of these regions being 11,362.4 and 9,311.2 mm^2. The summary also indicates that object specification has not been done for any other slice. Total area and volume are reported at the end of this listing for each object. Square brackets indicate the current slice. When REPORT is selected, the mouse button states become:

If you select DONE (right button), the most recent slice display is restored. Instead, you may point the cursor at a particular row in the summary report and click the left button (GO TO) to go to the slice indicated by that row.
REVIEW: This button gives a quick pictorial review of the object specification work done so far. The pictures displayed (as a montage) depend on the state of switch OUT. If its state is BIM, the object regions specified so far for the object indicated by OBJECT are displayed as a montage of binary images. If the state of OUTPUT is IM0, the grey images are displayed as a montage. When REVIEW is selected, the mouse button states become:
If you select DONE (right button), the most recent slice display is restored. Instead, you may point the cursor at a particular slice in the montage and click the left button to go to that slice.
OUTPUT: This is a switch with two states BIM and IM0. The states indicate the type of output to be done via the button SAVE in the output section of the mouse window. When the state is BIM, the objects specified are saved as binary scenes. When the state is IM0, the objects specified are saved as grey scenes with cell density being equal to that in the input scene if the cell is an object cell, otherwise the density is set to 0.
The objects actually saved in the file indicated by the tablet associated with the SAVE button depend on the state of the switch OUTPUT. If its state is ALL when SAVE is selected, all objects are saved in the file. For other states, only the particular object information is saved.
RESET: This is a button whose purpose is to reset some of the options to their default condition. It neutralizes the effect of FILTER and MAGNIFY and sets OVERL to ON. In the training mode, RESET sets all feature transform parameters used in live-wire tracing to their default values, see LIVE mode.
PAINT Mode
In this mode, object region specification is by a painting action. Various brush sizes can be used for this purpose. Painting can be done on the picture on the left or on the right. The mouse button states associated with this mode are as follows:

If you hold the left button depressed and move the mouse while the cursor is within the picture on the left, or on the right, the painted region will be indicated in the background (image window) color (on both pictures), and when you release the left button, the region will be "removed" from any already-specified region for the current object. A similar action with the middle button will result in the region specified being "added" to any already-specified region for the current object. You may choose bigger sizes of brush (via the panel option SIZE) to cover quickly bigger regions but smaller sizes to do controlled painting of borders, edges, and corners. The painting action should be terminated by clicking the right button before other options can be selected.
The panel options available under PAINT mode are illustrated in Figure 9.15. PREVIOUS, NEXT, SET INDEX, and GREY MAP have already been described in Section 7.2. MAGNIFY, FILTER, MODE, OBJECT, OVERL, DEL OBJ, LOAD OBJ, REPORT, REVIEW, OUTPUT and RESET function as described under the manual mode.
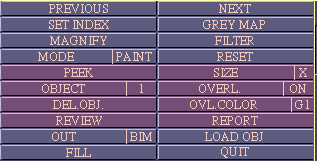
Fig 9.15: Panel Options for Interactive2D PAINT Mode of Object
Specification.
SIZE: This is a switch whose value determines the size of the paint brush. The default is set at X. The available states X, 1, 2, 5, 10, 15, 20, 25, 30, 35, 40, 50, 60. In state X, painting resembles tracing by manual mode and object regions are specified by the drawn boundaries as in Figure 9.12. In this state, you can draw in a rubber band mode by selecting successive points, or in a continuous cuve mode by holding the left button depressed, or in a free-hand continuous mode by quickly clicking the left button two times so that the curve can be drawn without holding the left button down. We recommend tracing in state X over the manual mode since it seems to be more convenient.
PEEK: This option is a button. When selected, it sets the mouse button states to:

As you move the cursor over the picture on the left or right, the dialog window displays the following message in real time: "(x, y): intensity [object #1], gradient", where (x, y) refers to the coordinates of the pixel indicated by the current position of the cursor in the current slice, "intensity" refers to the pixel intensity in the slice at that pixel, "object #" indicates the number of the object (if any) to which the pixel belongs, and "gradient" refers to the magnitude of the intensity gradient at the pixel. The intensity values at selected points can be printed on the picture (on either side) by clicking the left button when the cursor is at the desired location. Since printing may get corrupted by the presence of mask on the left, it is better to exercise this option on the picture on the right. This option should be terminated by clicking the right button before other options can be selected. This option is very useful to closely examine sites of interest from the viewpoint of their intensity and gradient values.
LIVE Mode
In this mode object specification is via their boundaries. The boundaries in turn are specified via live-wire tracing. The tracing process is controlled by the mouse buttons as illustrated in Figure 9.16. The process is analogous to tracing in the manual mode except that the boundary segments are determined automatically in live-wire tracing.
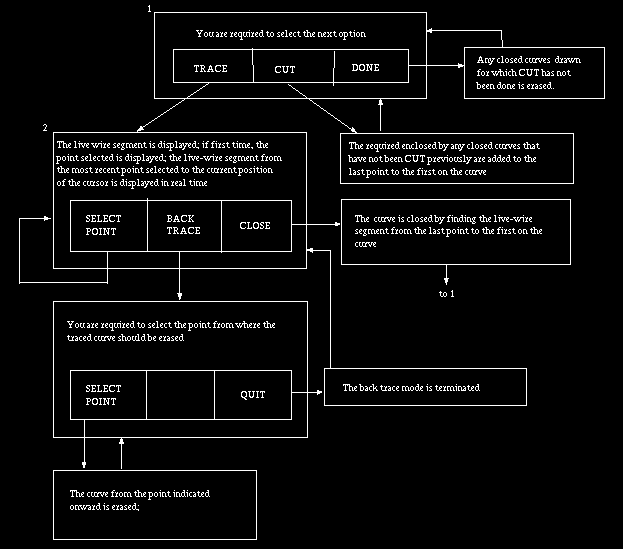
Fig 9.16: State Diagram for LIVE Mode of Object Specification in
Interactive2D. An arrow leaving a mouse button area indicates that that
button is clicked.
Live-wire tracing is always confined to the mask specified (via one of the options ROI and PAINT MASK or by default) for the current object. If, while tracing, the cursor goes outside the mask, a warning is given to this effect. The boundaries specified for any given object are not allowed to cross. They can, however, contain one another. For example, an annulus can be specified by two boundaries, one inside the other, both representing the same object. The way to handle this situation is to draw the two boundaries first and then select CUT in state 1 of Figure 9.16. Once cut and converted to an object region, any further boundaries can be used to only "add" to the object region. Structures and structure systems created with this arrangement can be visualized, manipulated, and analyzed freely without any restrictions.
If you have already started tracing a contour and you do not want to continue with it but wish to delete it (i.e., to "oops"), then choose the BACKTRACE option to erase the contour up to its first point and then choose BACKTRACE again. Alternatively, you may close the contour and then hit DONE, which effectively ignores all boundaries traced that have not yet been converted to regions.
The panel options available under LIVE mode are shown in Figure 9.17. PREVIOUS, NEXT, SET INDEX, GREY MAP have already been described in Section 7.2. MAGNIFY, FILTER, MODE, SIZE, OBJECT, OVERL, DEL OBJ, LOAD OBJ, REPORT, REVIEW, and OUTPUT have been described in the manual and PAINT modes.
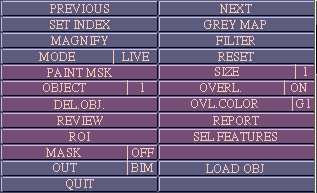
Fig 9.17: Panel Options for Interactive2D, LIVE Mode of Object
Specification.
ROI: Often it is advantageous to specify a mask region to which live-wire tracing is confined. This option is a button which allows specifying a rectangular mask quickly by changing the position and size of a rectangle interactively. The mouse button states associated with this option are illustrated in Figure 9.18. If the objects of interest occupy only a small portion of the slice, then it is a good idea to specify a rectangular mask that just encloses the objects since this will significantly speed up the interactive live-wire tracing process. It may also help in picking larger live-wire segments automatically. You may alternatively use the PREPROCESS-VOI command to create a scene that tightly encloses the objects of interest. These steps may significantly reduce the user time required in interaction.
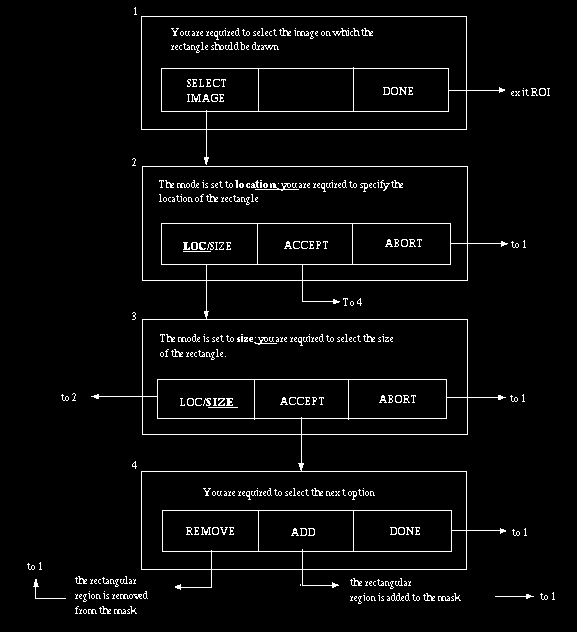
Fig 9.18: State Diagram for ROI option in Interactive2D. An arrow
leaving a button area indicates that that button is clicked.
Note that masks of different shapes can be created using the REMOVE and ADD mouse button options in state 4. For example, a rectangular annular mask can be created by selecting the larger rectangle first with an ADD option and subsequently choosing the smaller rectangle with a REMOVE option. Note also that rectangles can be specified on either of the two pictures.
A mask can be specified for each object independently using the ROI or PAINT MASK option. If you move to a new slice for which no mask has previously been specified, the masks of the current slice are assumed to be the default masks for the new slice. These masks can of course be changed.
PAINT MASK: This option, implemented as a button, is for specifying masks of arbitrary shape via a painting action. It works exactly like the painting operation in PAINT mode. Painting can be done on either of the two pictures with a brush of any available size. The mouse button states associated with this option are as follows:
If you hold the left button depressed and move the mouse while the cursor is within the picture, the painted region appears in the background (image window) color in both pictures, and when you release the left button the region will be "removed" from any already specified mask region for the current object. A similar action with the middle button results in the region specified being "added" to any already specified mask region for the current object. Since masking is less critical than painting for object specification, you may generally use large brush sizes for indicating mask regions.
As in ROI, a mask can be specified independently for each object. If you move to a new slice for which no mask has previously been specified, the masks of the current slice are assumed to be the default masks for the new slice. These masks can of course be changed.
SEL FEATURES: This option, realized as a button, is for selecting features on which live-wire tracing is based. In live-wire tracing, each pixel edge in the current slice is assigned a set of feature values. These feature values are converted to a "cost" value for each edge using one of several feature transform functions. In making this conversion, each feature is given a weight to indicate the level of importance of the feature in live-wire tracing. Given two points in the image, which are assumed to point to two pixel vertices (top-left), the program computes a path of minimum total cost from the first point to the second point as a sequence of connected pixel edges. This constitutes a live-wire segment. Since this computation is done in real time for an anchored point and the point indicated by the current position of the cursor, the live-wire segment and its appropriateness as a real boundary segment can be tested interactively.
When SEL FEATURES is selected, it sets up its own subpanel, as shown in Figure 9.19, to assist the users in selecting an appropriate combination of features, the feature weights, and the feature transforms. It also allows them to display the feature values and cost values as pictures so that they can visually assess how effective these parameters may be.
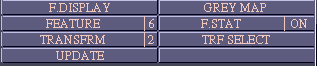
Fig 9.19: Subpanel Options Associated with SEL FEATURES.
When SEL FEATURES is selected, the mouse button states become:

and several entities are displayed on the lower-left side of the image window as shown below.
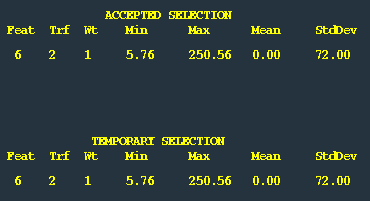
Here, TEMP SELECTION indicates the parameters that have been selected temporarily but that may not have been confirmed for acceptance to the live-wire tracing process. The parameters under ACCEPTED SELECTION indicate those that are currently actually used in live-wire tracing. To use the parameters that you have tested and found good eventually in the actual live-wire process, you should make them ACCEPTED SELECTION by selecting the UPDATE option in Figure 9.19. In the tabulation shown above, Feat, Trf and Wt refer to the feature, transform and the weight given to the features. Min, Max, Mean and Std Dev represent the parameters of the feature transform. These entities are described in detail under the sub-options of SEL FEATURES.
The right button should be clicked to terminate this option and to go back to the panel of the LIVE mode.
F. DISPLAY: This option, a button, is for displaying the following entities as images: feature values for the current feature (shown by the switch FEATURE for which the switch F. STAT is ON) at all pixel edges in the slice, the cost values at all pixel edges in the slice that result from applying to the feature image the feature transform currently selected (as listed in TEMPORARY SELECTION), and the joint cost values at all pixel edges in the slice taking into consideration all features that are currently selected and their associated weight and feature transform (as listed in TEMPORARY SELECTION). The current slice is also displayed for reference. The order of display is as follows. First row: current slice, feature image, feature cost image; Second row: joint cost image.
The pixel intensity in the displayed pictures is directly proportional to the entity it represents. For example, brighter regions in the feature cost image indicate higher cost due to that particular feature. Your aim should be to select a combination of features and feature transforms such that a band, as dark as possible, is produced in the joint cost image at the location of the alleged boundary with as few dark regions as possible in the close vicinity of the boundary otherwise. Combinations of features and feature transforms are selected via the switches FEATURE, F. STAT, TRANSFORM, and TRF SELECT. F. DISPLAY should be selected to visually assess the effectiveness of the current combination. When F. DISPLAY is selected, the list under TEMPORARY SELECTION is updated to reflect the current combination that is being tested. The display under TEMPORARY SELECTION shown previously indicates that features 5 and 1 have been currently selected both with transform 4 and an equal weight of 1 each. ACCEPTED SELECTION indicates that only feature 5 with transform 4 has been accepted (via the option UPDATE), and therefore, only this combination will be used in live-wire tracing.
GREY MAP: This is disabled for this version of 3DVIEWNIX.
FEATURE, F. STAT: These are both switches which should be used for selecting a desired combination of features. To include a particular feature in the combination, select the feature on the switch FEATURE and turn its status to ON on the switch F. STAT. The feature image and the feature cost image displayed correspond to the particular feature whose number is currently displayed in the switch FEATURE. If its status is OFF (as indicated by the value of the switch F. STAT), F. DISPLAY will not display any of the images.
A brief description of each feature is given below. When a particular feature is selected via FEATURE, its symbolic description is displayed in the dialog window. Recall that features are associated with pixel edges.
A detailed meaning of the features is given below.
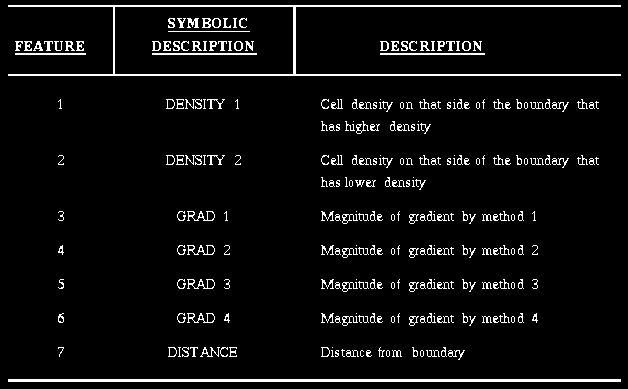
FEATURE 1: Every pixel edge separates two pixels in a slice. FEATURE1 is the intensity of that pixel which is on the side of the tip of the gradient vector, relative to the edge, estimated at the center of the edge (see Figure 9.20).
FEATURE 2: It is the intensity of the pixel which is on the side of the tail of the gradient vector, relative to the edge, associated with the edge; see Figure 9.20.
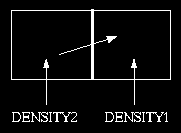
Fig 9.20: Description of "DENSITY1" and "DENSITY2" relative to a
pixel edge based on the gradient vector associated with it.
FEATURE 3: It is the magnitude of the gradient defined to be |b - e|, see Figure 9.21.
FEATURE 4: It is the magnitude of the gradient defined to be , see Figure 9.21.
FEATURE 5: If is the magnitude of the gradient defined to be , see Figure 9.21.
FEATURE 6: It is the magnitude of the gradient defined to be , see Figure 9.21.
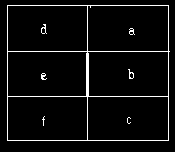
Fig 9.21: The Neighborhood Used in Defining the Various Gradient Operators.
The edge under consideration is the edge separating pixels b and e. For a
horizontal edge, the expressions are analogous, but the figure should be
rotated 90.
FEATURE 7: It is the distance of the pixel edge from the boundary . This appears to be a circular definition since we do not know the boundary and we hope to find it using the feature. The idea here is to use the boundary found in the previous/next slice as a guide to find the boundary in the current slice. This feature then is defined to be the distance of the edge from the boundary found in the previous/next slice. The program actually uses the most recently found boundary. If you do not trace boundaries in a slice-by-slice order the boundary may not belong to the previous or the next slice. The main idea here is to make the boundary being found in the current slice as close as possible to the most recently found boundary.
The default setting for these switches is the same as that used in the most recent session. This information is saved in objects.TMP and automatically loaded at the beginning. Therefore, you can continue with the settings you used before a break without your requiring them to be set up all over, unless someone else used Interactive2D in your directrory and modified this information.
TRANSFORM: This is a switch with four status, 1 to 4. Each state corresponds to a particular feature transform -- a function that assigns a cost value to each feature value. To select a feature transform for a particular feature, select the feature on the switch FEATURE, turn its status to ON via F. STAT then select the option TRF SELECT. When a feature and a transform pair is selected in this manner, a set of scales are set up in the dialog window for the selection of the parameters of the feature transform and the weight to be associated with the feature.
A brief description of the feature transforms is listed below. When a particular transform is selected, its symbolic description is displayed in the dialog window.

Fig 9.22: Feature Transforms Used for Converting Feature Values to Cost
Values in Live-Wire Tracing: (a) RAMP, (b) GAUSSIAN, (c) INV. RAMP, (d)
INV. GAUSSIAN.
The parameters of the transforms have certain default values associated with them. If training is used (see description under TRAIN mode), these assignments are made based on the values estimated during training. You may wish to change these assignments using the scales provided for the parameters. The effectiveness of a particular choice of parameters (i.e., of a particular transform) for a particular feature can be assessed visually by selecting F. DISPLAY. If the feature cost image has dark segments along the boundary being sought, then the combination of the feature and the transform can be considered to be effective in live-wire tracing, although there may be dark patches away from the boundary.
The default settings for the feature transform parameters at the beginning of Interacive2D are the same as those used in the most recent session with this command. These are saved in objects.TMP and automatically loaded at the beginning. Therefore, you can continue with these settings after a break without your requiring them to be set up again, unless someone else used Interactive2D in your directory and modified this information.
TRF SELECT: This is a button whose purpose is to effect a selection of the transform currently indicated in the switch TRANSFORM for the feature indicated in FEATURE. F. STAT should be ON for this selection to take place.
TRAIN mode
The main purpose of this mode is not the actual specification of objects but to aid in estimating values of the parameters (MIN, MAX, MEAN, STD. DEV) of feature transforms that are likely to be effective in live-wire tracing. You are required to trace/paint pixels in the close vicinity of the alleged boundary. For the edges of these traced/painted pixels, the minimum, maximum, mean, and standard derivation of feature values are calculated for all features (except FEATURE 7). The values assigned to the parameters of feature transforms are determined based on these feature parameter values according to some predetermined strategy. You may check the effectiveness of the values of the feature transform parameters via the F. DISPLAY option. You may then fine tune these values or may completely disregard them.
The mouse button states associated with this mode are illustrated in Figure 9.23. The pixels drawn/painted are shown in translucent color so that you may still see the underlying intensity distribution. The panel options available for this mode are shown in Figure 9.24. PREVIOUS, NEXT, SET INDEX, GREY MAP have been described in Section 7.2 and MAGNIFY, FILTER, MODE and SIZE, earlier in this section.

Fig 9.23: State diagram for TRAIN mode of Interactive2D. An arrow leaving a
button area indicates that that button is clicked. In states 2 and 3, the left
button can be held depressed for continuous action.
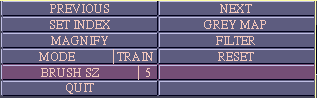
Fig 9.24: Panel Options for TRAIN mode in Interactive2D.
RESET: It is a button which when selected sets the feature parameters and the feature transform parameters to their default values. The default values are determined based on the possible range of variation of features. This option essentially neutralizes the effect of training. The TRAIN mode actually accumulates statistics as you trace/paint new segments. If you are not sure as to which segments you may have included in gathering statistics, it is always advisable to start afresh by selecting this option. As in other modes, this option also undoes the effect of MAGNIFY and FILTER.
To use the TRAIN mode effectively, the boundary segments to be traced (i.e., to be included in learning) should be chosen carefully. It is important not to include segments that are distractors or that do not indicate the main characteristics of the boundaries. The live-wire algorithm is good at "bridging the gap" based on information about typical segments. As you gain more experience with this method and as to what extent it depends on various features, you will be able to harness its power more effectively.
Notes on Usage of Interactive2D:
The objects of interest often occupy a small region within the domain of the given scene. For speed of processing, peppier interaction, and to save the time users have to spend in interactive segmentation, it is advisable to extract via PREPROCESS-VOI the smallest subscene that just includes the objects of interest. This may often also improve the effectiveness of live-wire tracing.
Mainly for saving users' time and also for possible improved accuracy of object portrayal, it is also advisable not to perform scene interpolation prior to interactive segmentation. Interpolation may increase the number of slices to be processed 2-6 fold. Generally, (shape-based) interpolation of the binary scene(s) output by Interactive2D produce more accurate results than interpolation of grey scenes .
If a large number of data sets (e.g., 4D scenes of MR heart data for 50 subjects) need to be processed , we recommend that some time be invested in determining optimum masking, optimum features and optimum values of feature transform parameters. A mask specified on one slice gets repeated automatically on subsequent slices. Therefore, if you can choose a mask that is appropriate for all slices, it needs to be specified only once for one data set. FEATURE 6 with TRANSFORM 4 or FEATURES 1, 2 and 6 (with equal weighting) all with TRANSFORM 4, or FEATURE 1 or 2 with TRANSFORM 4 seem to be quite effective in many low-contrast boundary segmentation tasks. If the boundaries do not change significantly from slice to slice, after the boundaries in one slice are segmented, it is useful to invoke FEATURE 7. TRANSFORM 1 should be used with this feature with MIN set near 0 and MAX about 10.
All transform parameters are expressed relative to the minimum and maximum cell intensities in the slice. Hence they may change from slice to slice. If cell intensity ranges change significantly, you may need to retrain after some slices.
In case of multiple objects, the total time required for segmentation depends on how disparate the object characteristics are and whether or not you segment all objects simultaneously. If each object requires a different FEATURE-TRANSFORM combination, then it may be advantageous (in the current set-up) to segment one entire object (i.e., all slices) first before taking up the next object. If a common FEATURE-TRANSFORM combination can be found, then it is advantageous to segment all objects in a slice first before going to the next slice.
Recall that you may intermix manual and live-wire tracing and painting. Whether or not this has an advantage over the pure modes depends on the actual application. If only manual tracing is appropriate, we recommend the use of PAINT mode in state X for the switch SIZE over the manual mode because of the convenience it offers. But only manual mode can be mixed with LIVE mode and not PAINT in SIZE X.
SceneOperations-Segment-2Features
This command accepts two IM0 files (constituting 3D or 4D scenes) as input and produces one or more output files of type BIM via clustering .
3DVIEWNIX stores information about location and orientation of the scene coordinate system relative to a fixed imaging device coordinate system. If the original data had correct entries for this information, all scene operations carry this information in the output files with any modification needed and this information will be always correct. It is important that the two input scenes for 2Features should have the same relative orientation and appropriate relative location. It is not necessary that the size of the slices of one input scene be identical to that of the other scene. But their location should be such that the corresponding slices have some overlap. This command will complain if no overlap exists.
Upon selection of 2Features, the corresponding slices of the two input scenes are displayed on the left side of the image window and the segmented (by clustering) binary slices are displayed on the right side. The scatter plot for the current slice from the two input scenes for some specified regions in these slices is displayed in the center. The default slice is the first slice. To begin with, the scatter plot is empty since no regions are specified. Further, since no clusters are specified, the resulting binary slices have only 0-cells. The regions to be used for creating the scatter plot are specified by drawing closed curves on the display of the input slices. The clusters are indicated by drawing closed curves on the scatter plot. The mouse button state diagram of Figure 9.25 illustrates how these specifications are done.
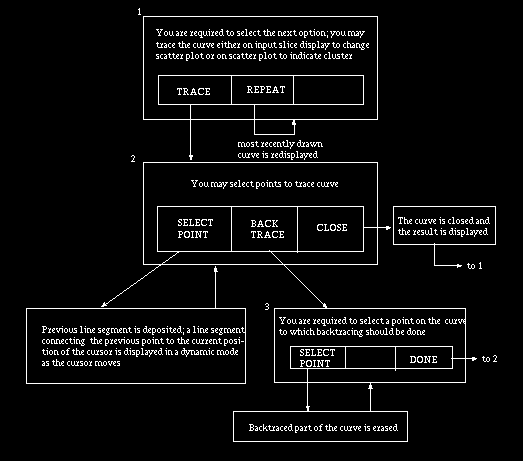
Fig 9.25: State Diagram for SceneOperations-Segment-2Features. An arrow
leaving a mouse button area indicates that that button has been clicked.
The TRACE option should be used whenever the scatter plot has to be updated or a cluster is to be specified. The REPEAT option allows reproducing the previously drawn curve on the current slice or current scatter plot. The panel options available under this command are shown in Figure 9.26.
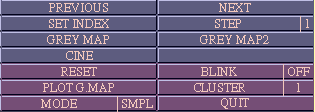
Fig 9.26: Panel Options for SceneOperations-Segment-2Features.
STEP: This is a switch with 8 states called 1, 2, . . . . ,8. The state indicates how the slice indexes are stepped in PREVIOUS, NEXT, and CINE. When STEP is in state 2, for example, slice indexes change as follows for a 3D scene if we start from slice 5 and click NEXT repeatedly: 5, 7, 9, . . . .
RESET: This is a button which when selected restores the situation to that which existed soon after 2Features was initiated. In particular, all clusters are set to empty and the binary images on the right are cleared.
PLOT G.MAP: This is a button which allows changing the grey map of the scatter plot. Since the scatter plot, viewed as an image, has potentially a different range of intensity values, a separate grey map is used to adjust its display. GREY MAP applies only to the display of the input slices.
CLUSTER: This is a switch with 8 states, called 1, 2, . . . . . ,7, and ALL. A set of clusters, indicated as closed curves on the scatter plot, can be associated with each state. Each state may be thought of as representing a particular object, tissue type, material, etc. The binary images resulting from segmenting with the clusters associated with each state are displayed in a unique color to identify this possible representation of a unique entity. In state ALL, a cell has a value 1 in the binary image if its feature values form a point in any of the specified clusters 1, 2, . . . . ,7. When the state of CLUSTR is changed, the clusters associated with the new state are indicated on the scatter plot and the resulting binary image is displayed on the right in the color associated with that state. The binary images resulting from the clusters associated with each state can be output to a separate BIM file by setting the state of the OUTPUT switch in the mouse window to the desired state and selecting SAVE.
MODE: This is a switch with two states, SMPL (for simple) and CUM (for cumulative). In the SMPL state, as outlining of a region on the slice display is completed, the scatter plot is computed for that region and displayed. In the CUM state, the scatter plot information is accumulated, but displayed whenever a region specification is completed (curve closed). In this state, thus, it is possible to compute the scatter plot for regions specified on several slices. If the region does not change, the cumulative scatter plot can be computed by setting this switch to CUM, drawing the curve(s) on one slice and reproducing them on other slices via REPEAT.
The remaining panel options for this command are as described in Sections 7.2 and 9.1.2.
To illustrate how this command may be used, consider the case when the
two given data sets are 4D scenes. (Note that these may be scenes
computed from some original scene(s) or original scenes themselves.)
First use SET INDEX to select an appropriate slice of the input scenes.
Suppose we need to output two 4D binary scenes corresponding to two
cluster specifications. Set CLUSTR to state 1, MODE to CUM, outline
region(s) on the input slice(s), and when an appropriate scatter plot is
developed, outline curve(s) on the scatter plot to specify the clusters
associated with CLUSTR 1. Now set MODE to SMPL, CLUSTR to 2 and specify
the region(s) on slice(s) for computing scatter plot and subsequently
specify the cluster(s) to be associated with CLUSTR 2. If you wish to
accumulate more regions, you should change the state of MODE to CUM
subsequently before specifying additional regions. You may wish to
examine the segmentation results for CLUSTR 1 and CLUSTR 2 using the
slice display options PREVIOUS, NEXT, and CINE. Now set OUTPUT to CLUSTR
1, and change the default file name if desired, and select SAVE.
Subsequently, do the same procedure with OUTPUT in state CLUSTR 2. If
you wish to create the output binary scenes in the background mode, set
RUN_MODE to BG before selecting SAVE.
9.1.3.6 Classify
The commands under Classify allow classification operation on input
scenes. The output is a scene or a non-binary shell. The following
commands are available: 1Feature, 2Features.
SceneOperations-Classify-1Feature
This command accepts one IM0 file as input and produces one or more output files of type IM0 or SH0. Classification is done via functions of the form shown in Figure 9.27 . Several functions can be specified, for each of which an IM0 or a SH0 file can be created. The cell size in the output need not be the same as that in the input. Multiple functions of the form shown in Figure 9.27 can be specified to indicate the presence of multiple classes in a single output. Each function in this case can be thought of as indicating the likelihood of a cell being in that particular class. This can also be interpreted as the extent of presence of an object or material of the particular class in the cell under consideration.
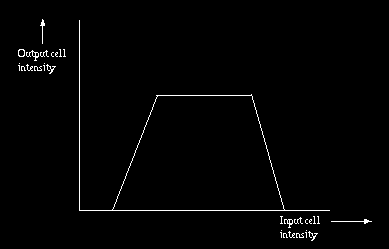
Fig 9.27: Classification Function Used in
SceneOperations-Classify-1Feature.
Upon initiation of this command, three display areas are created in the image window (as in Segment-Threshold). The area on the left is used for displaying the slices of the input scene. The default slice displayed is the first slice of the scene. The area in the middle displays a histogram of cell intensities of the current slice. The area on the right displays the output slice resulting from applying the current classification function to the current slice. The current classification function is selected via the switch CLSFN FN. The default classification functions are such that the output slice contains all 0's. The classification functions are specified interactively. The current function is always displayed on the histogram. The mouse button states associated with this command are shown in Figure 9.28.
As in other slice display commands, the slice indexes are displayed at the upper-left corner of the slice display. Whenever a classification function is eventually accepted (in states 2--5 of Figure 9.28), the non-binary slice resulting from classification using that function is displayed on the right. If the function that is being modified is eventually not selected (but aborted in states 2--5 of Figure 9.28), the most recently accepted function for that state of the switch CLSFN FN is reinstated. The classification function associated with each state of CLSFN FN is specified interactively by selecting the position of the four points of the trapezoidal form.

Fig 9.28: State diagram for SceneOperations-Classify-1Feature. An arrow
leaving a button area indicates that that button is clicked.
The panel options available for this command are shown in Figure 9.29.
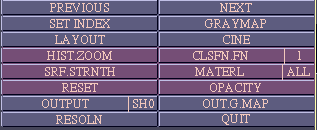
Fig 9.29: Panel Options for SceneOperations-Classify-1Feature.
CLSFN FN: This is a switch with a maximum of five states labelled 1, 2, 3, 4, and ALL, the default state being 1. With each state, a classification function can be associated. When a particular state is selected, the function associated with that state, if any, is displayed and the resulting slice after classification is also shown. The user can modify this function using the mouse button options as illustrated in Figure 9.28. Each state is assigned a fixed color to indicate the distinct object type, tissue type, or material the classification function may represent. When the state of this switch is ALL, all functions are considered. This means that the cells of the resulting slice have multiple intensities each representing the amount of material corresponding to a particular classification function. The display on the right now represents a binary scene in which a cell has an intensity value 1 if any of the materials is present in the cell, and 0 otherwise.
The default functions associated with the different states of this switch are all such that they associate a 0 value with all input cell intensities.
We assume that the material corresponding to CLSFN FN 1 is air. Therefore, if you use only the first function to create a shell, the rendition done via Volume-View will not show anything. Use any other classification function for creating a shell based only on one material. See also "Notes on Usage" at the end of this section.
SRF STRNTH: This is a button which when selected provides a scale in the dialog window. The purpose of the scale is to specify the maximum value for the strength of depiction of surfaces in the shell output by 1Feature. This value is used in scaling the actual surface strength calculated based on gradient magnitudes in the input scene. Choosing a low value results in the surfaces appearing strong in the rendition of the shell via VISUALIZE-Volume. A high value has the reverse effect.. Note that there is a similar option available in VISUALIZE-Volume also. You should experimentally determine the appropriate value to be chosen based on your application and the nature of the rendition you wish to create.
MATERL: This is a switch with two states ALL and ONE. If more than one classification function is to be specified, this switch should be set to ALL. Otherwise its state should be set to ONE. The reason for this distinction is that when two or more functions are specified, there are restrictions imposed on the functions to ensure that the material mixture model makes sense. For example, the slope of the second ramp of one function should be the same in magnitude as the slope of the first ramp of the next function. These conditions are automatically guaranteed when functions are specified when the state of MATERL is ALL. Note that, in an individual function, the magnitude of the slope for the first ramp may be different from that of the second ramp.
The default state of this switch is ALL.
RESET: This is a button whose function is to reset the classification functions to their default settings. When this option is selected, the classification result displayed on the right becomes a 0 image, that is it will have only 0-cells.
OPACITY: This is a button which when selected sets up a scale called OPACITY for selection of the maximum opacity to be assigned to the material of the type indicated by the current CLSFN FN. Selecting lower values causes the corresponding material to appear more translucent in the rendition of the shell.
OUTPUT: This is a switch with two states IM0 and SH0, IM0 being the default. In state IM0, the output created by selecting SAVE in the mouse window is an IM0 file that contains the slices representing the result of classification. In state SH0, the output created is an SH0 file that contains a Shell0 representation of the result of classification . In Shell0, only cells with non-zero intensity are included.
OUT G.MAP: This is a button which allows changing the grey map of the slice resulting from classification via scales that it sets up. These do not alter the input slice display. GREY MAP should be used for the latter purpose.
The switch OUTPUT in the mouse window takes states FN1, FN2, FN3, FN4 and ALL. In each state except ALL, only the corresponding classification fashion is used and in ALL, all functions are used for creating the output. In the case of a 4D scene, an output should be created for each instant of the fourth dimension for each shell to be created, since commands that allow visualizing and analyzing non-binary shells do not handle structure systems as input at present. However, when the desired output is a scene, a 4D scene is output for the classification function(s) chosen via the state of OUTPUT. As in other commands, the actual classification operation can be run in the foreground or background.
The remaining panel options work as described in Sections 7.2 and 9.1.2.
Notes on Usage of Classify-1Feature:
We assume that the material corresponding to the first classification function is air. This means that if you use only one function for creating a shell and if this is selected via CLSFN FN 1, then when the shell is viewed via Volume-View, you will not see anything since this command always assigns 0 opacity value to air. Other functions (2, 3 and 4) are for representing other materials. If you use any of these functions on its own, you will be able to visualize the resulting shell. We assume in such cases that the material represented by each of these functions is surrounded by air and hence the air-material interface will become visible. When multiple functions are used, via the ALL state of MATERL, additionally, the interfaces between the materials represented by the successive functions will all be portrayed.
The resolution for output can be made different from that of input only for x_1, x_2 and x_3 directions and not for the x_4 direction if the input is a 4D scene.
To illustrate how the various panel options can be used to create a desired output, we give an example. Consider a 3D input scene and suppose there are two types of material that we need to classify and that the output should be shells of type Shell0. To proceed, first set OUTPUT (panel) to SH0, choose the desired resolution, set MATERL to 1 and set CLSFN FN to 2. Next select the classification function corresponding to the first material as per Figure 9.28 using the slice display options PREVIOUS, NEXT, and CINE if necessary. Set CLSFN FN to 3 and similarly select an appropriate function for the second material. Now set switch OUTPUT in the mouse window to 2, change output file name shown in the tablet if necessary and select SAVE. This will create a shell for the first material. Subsequently, change OUTPUT to state 3 and SAVE shell for the second material.
To create a single shell that contains both materials, set MATERL to ALL and specify the two functions via the states CLSFN FN 1 and CLSFN FN 2. Although each function may have had different slopes for the two sides which may have been different from those of the other function, when specifying as a mixture, their slope magnitudes should match end to end. This is guaranteed as you specify the two functions. Once the functions are chosen appropriately, set the OUTPUT switch in mouse window to ALL, specify an appropriate output file name, and then select SAVE.
SceneOperations-Classify-2Features
This command accepts two IM0 files each containing a scene constituting a cell feature as input and produces an IM0 file or an SH0 file as output. Classification is done via a function of the form shown in Figure 9.30. The function value can be thought of as indicating the likelihood of a cell being in the class corresponding to the annular region between the two rectangles or can be interpreted as the extent of presence of an object or a material of the particular class in the cell under consideration. The two features may represent imaged scene density values or may be computed from imaged scenes. For example, the input scenes may represent T2 and proton density values of the MR images of a patient's brain. They may also represent an imaged scene of T2 values and another scene of gradient magnitude values obtained from the first scene. One of the scenes may also represent the gradient magnitude values of a gradient magnitude scene. (The gradient magnitude scene of an input scene can be obtained via the command PREPROCESS-FILTER.)
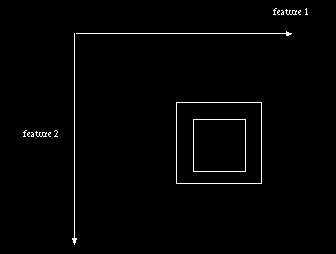
Fig 9:30: Classification Function for SceneOperation-Classify-2Features.
The function has two independent variables -- feature 1 and feature 2 values.
The function is indicated on the scatter plot of the two features. The
function value inside the inner rectangle is 1 and out-side the outer
rectangle is 0. Between the two rectangles, it varies roughly in the shape
of a pyramid changing gradually from 0 to 1.
The main interaction required in this command is for specifying the two rectangles. If the two rectangles are such that one of them is not inside the other, the command will not permit the classification operation. The mouse button states associated with this command are shown in Figure 9.31.
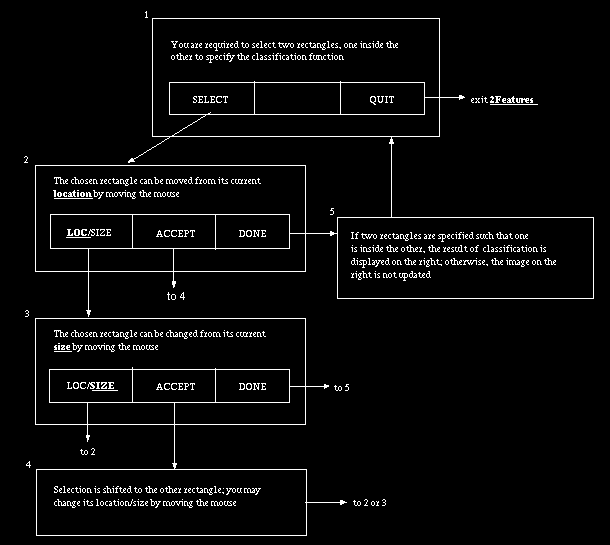
Fig 9.31: State Diagram for SceneOperations-Classify-2Features. An arrow
leaving a mouse button area indicates that that button has been clicked.
Upon initiation of this command four display areas are created in the image window. In the two areas on the left, the corresponding slices of the two input scenes are displayed. In the area in the middle, the 2D scatter plot of the cell intensities (feature values) is displayed for the current slices. The area on the right is for the display of the slice resulting from applying the current classification function to the two current slices. Your aim should be to choose the layout and size of the rectangles such that the boundary (or the region) of the object of interest is represented adequately in the display on the right.
The panel options available for this command are shown in Figure 9.32. PREVIOUS, NEXT and SET INDEX work as described in Section 7.2. GREY MAP1, GREY MAP2, PLOT G.MAP and OUT G.MAP work like GREY MAP but operate on the two input scenes, the scatter plot and the output image, respectively. CINE, OPACITY and RESOLN work as they do for the command SceneOperations-Classify-1Feature.
RESET: This is a button which when selected resets the classification function to the default setting of the two rectangles and updates the output image displayed on the right.
OUTPUT: This is a switch with two states, SH0 and IM0, SH0 being the default state. When the state is SH0, the output created by initiating the SAVE option of the mouse window will be a non-binary Shell0 structure . When the state is IM0, the output created will be a scene.
Once the parameters of the classification function have been finalized, to initiate the actual output operation, the SAVE option in the output section of the mouse window should be selected. You should change the name of the output file to the desired name in the associated tablet before selecting SAVE.
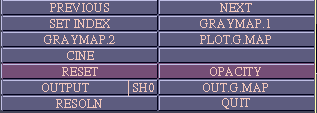
Fig 9.33: Panel Options for SceneOperations-Classify-2Features.
9.2 StructureOperations
9.2.1 Summary of Commands
These commands allow certain operations to be carried out on structures.
The result is either a structure, a structure system, or a scene.
Input allows selecting input files of type BS0, BS1, SH0, SH1, and
CURVE0 (and IM0 as an auxiliary input). SurfaceNormal requires a
structure file (BS0, BS1, SH0, or SH1) as the primary input and a scene
(IM0 file) as an auxiliary input. The scene is used for computing the
surface normal to be associated with the various elements of the input
structure. MergeStructures requires two input structure files of the
same type (BS0, BS1, SH0, or SH1). It puts the input structure into a
single file retaining appropriately the associated parameter vectors.
ToStructure commands allow conversion between structures: BS0 to BS1 and
BS1 to BS0. ToScene commands convert the input Curve0 structure to a
binary scene (BIM file) by assigning to all cells interior to the closed
curves in each slice an intensity value 1 and to the rest 0 intensity.
They also convert the input Shell0 and Shell1 structure each to a binary
scene by assigning an intensity value 1 to cells interior to the
structure and 0 to the rest.
9.2.2 Commands
9.2.2.1 SurfaceNormal
This command accepts one file of type BS0, BS1, SH0 or SH1 containing a
structure or structure system as primary input and another file of type
IM0 containing a scene as secondary input. Its function is to change the
surface normal information associated with the elements of the input
structures. The power of this command lies in the fact that, often it is
better to use a different scene to compute surface normal information
from the scene used for obtaining structure information. An example of
this situation is when structures are defined interactively as in
PREPROCESS-Interactive2D. Surface normals estimated from gradients
computed from the original scene often do not give adequate surface
renditions in such situations. It is better to use the scene resulting
from filtering the user-segmented binary scene. Similar situations arise
in volume rendering using shells. A reverse situation also exists. That
is, the original scene is good for surface normal definition but not for
structure definition itself. This command allows the two operations to
be done quite independently ( contains a systematic treatment of this
topic).
Upon selection of this command, the mouse button states become as shown in Figure 9.34a. The panel option available is shown in Figure 9.34b. NORMAL is a switch with two states called 8 and 26. The states correspond to two different gradient methods of computing normal. Usually, in state 26, the normals lead to smoother-looking renditions than in state 8. However state 26 may require more computation time.
 (a)
(a)
 (b)
(b)
Fig 9.34: Mouse Button and Panel Options for
StructureOperations-SurfaceNormal.
To actually initiate surface normal computation, give an appropriate
output file name in the tablet corresponding to output file name (this
can be the input file itself), and select SAVE.
9.2.2.2 MergeStructures
This command accepts two files of type BS0, BS1, SH0 or SH1 each of
which contains a structure or a structure system. It puts the structures
into a single output file along with the associated parameter vectors.
The two files should be of the same type and the resolution of the
structures contained in one file should be the same as that of the
structures in the other file. The associated parameter vectors are
retained in the output file without any modification. Suppose there are
two structures in one input file of type BS0 with parameter vectors (1,
1, 1) and (2, 1, 1) representing (object#, time instant, modality) and
one structure in another file of type BS0 with parameter vector (1, 1,
1) representing (time instant, modality, object#). Upon merging, the
parameter vectors are retained as they are, although they do not have a
consistent interpretation. It is the users' responsibility to make sure
that the structures to be merged have the same parameter vector
description and when put together the vectors make sense.
To initiate merger, simply select SAVE option in the output section of
the mouse window after changing the output file name if needed. Click
the right mouse button to exit this command.
9.2.2.3 StructureToStructure
There are two commands under this command. Shell0ToShell1 accepts a file
of type BS0 containing a structure or a structure system and converts it
to a file of type BS1 containing the converted structures.
Shell1ToShell0 accepts a file of type BS1 containing a structure or a
structure system and converts it to a file of type BS0 containing the
converted structures.
In both cases, to initiate output, simply select the SAVE output option
in the mouse window. The default output file name in each case is the
same as the input file with an extension corresponding to the output
file type. To exit from these commands, click the right button.
9.2.2.4 ToScene
At present ToScene has three commands under it called Shell0ToScene,
Shell1ToScene, and Curve0ToScene.
Shell0ToScene accepts a file of type BS0 containing a binary Shell0 structure and converts it into a binary scene by assigning an intensity of 1 to all cells in the interior of the object and an intensity of 0 to all cells in the exterior of the object. Shell1ToScene and Curve0ToScene do analogous operations on input files of type BS1 and CV0, respectively, to create a binary scene.
To actually create an output in these commands, simply select the SAVE option for output in the mouse window. The default output file name should be changed, if desired, prior to selecting SAVE. To exit from these commands click the right button.
 User Manual
 Library Ref. Manual
 Tutorial
