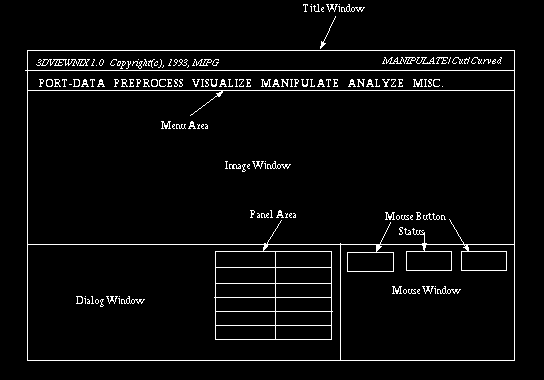
Fig 4.1: Screen Layout in 3DVIEWNIX.
Fig 4.1: Screen Layout in 3DVIEWNIX.
Title Window is a fixed region at the top of the screen which at all times displays 3DVIEWNIX title and versions on the left and the currently selected command sequence from the menu on the right.
Image Window is an area dedicated for the display of pictures and other related information. The top portion of this window is the menu area which is used for displaying the 3DVIEWNIX menu system. Commands are selected from this system to execute various 3D imaging operations provided by 3DVIEWNIX.
Dialog Window occupies the bottom left part of the screen and is used for displaying prompts, results, and error messages at the top of the window and scales that are used for selecting values of parameters used in various operations. In addition, it contains a panel area which consists of buttons and switches that are used for selecting options, subfunctionalities and subcommands while a command selected from the menu is being executed.
Mouse Window is an area on the bottom right part of the screen. It is used for displaying at all times the function of the three mouse buttons near the top of the window. This display of the functions together with the prompts and messages appearing in the dialog window should be adequate for the users to carry out 3D imaging operations, once they gain some familiarity with the general operation of 3DVIEWNIX. Therefore, we suggest that the users always give proper attention to what is displayed in these areas. The bottom part of the mouse window contains buttons and switches for providing certain options and subcommands that are needed for all commands selected from the menu system. We call them static options. As an example, one of these options allows the dialog window to be turned off temporarily so that the image window can be extended to the bottom of the screen.
This window is occasionally also referred to as button window.
4.2 Use of Mouse
The user interface design of 3DVIEWNIX is based on a 3-button mouse. We
refer to these as left, middle and right mouse buttons. The
functionality of the buttons is displayed within the respective button
area in the mouse window (Figure 4.1). This may change as the cursor is
moved from one window to the other. In order to execute the
functionality associated with a particular mouse button, you just need
to click that button from wherever the cursor happens to be. It is
neither needed nor advisable to bring the cursor to the respective mouse
button area in the mouse window and then to click the corresponding
mouse button.
We have tried to keep the convention of use of the mouse buttons simple and consistent. A mouse button function is initiated always by a click. Other actions such as multiple clicks or the simultaneous use of multiple buttons or holding one or more buttons pressed is not required. The "selection" function is always associated with the left and/or the middle button and "termination" with the right button. When items are to be selected from an ordered list, the "next" function (to select the next item) is associated with the left button and the "previous" function is associated with the middle button.
The use of the mouse also follows similar notions and a "freehand"
principle. The mouse movement within the image window is often used to
change a processing parameter in a continuous and interactive function,
for example, to change the height and width of a rectangle displayed in
the image window. Moving the mouse to the left or down reduces the
associated value and to the right and up increases the value. In the
previous example, as the mouse is moved to the left (right), the
rectangle becomes narrower (wider), and as it is moved down (up), the
rectangle becomes shorter (longer). Often, an appropriately shaped
cursor is display to indicate the mouse action. The "freehand" principle
means that it is not needed to keep a button pressed while moving the
mouse in order to execute the mouse movement function. Other examples of
the functions associated with mouse movement are: display of the slices
of a 3D or a 4D scene, cine display of precreated renditions of a
structure or of a structure system, and 3D rotation of a structure or of
a structure system for rendering.
4.3 The Menu System
The commands needed to execute the 3D imaging operations available in
3DVIEWNIX are organized hierarchically in the form of a tree. The
commands are grouped into six categories called PORT-DATA, PREPROCESS,
VISUALIZE, MANIPULATE, ANALYZE, and MISCELLANEOUS. PORT-DATA contains
commands for transporting scene data generated by outside sources into
3DVIEWNIX and for sending data out from 3DVIEWNIX. The next four
categories contain commands for preprocessing, visualizing,
manipulating, and analyzing multidimensional data. MISCELLANEOUS
contains miscellaneous commands of general utility. When one of the
major commands is selected (all commands in the menu system are selected
by placing the cursor in the box that contains the command and clicking
the left or the middle mouse button), the subcommands in that group are
displayed as a horizontal list immediately below the current level. When
one of these subcommands is selected, its own subcommands are again
displayed in this manner. When none of the subcommands of a particular
command has its own subcommand, the subcommand list is displayed as a
vertical list of commands. The subcommands displayed as a horizontal
list are called horizontal menus and those displayed as a vertical list
are called vertical menus. This form of menu organization and display
allows retaining and presenting the hierarchical grouping of menus in a
compact manner. During the selection process, the user can go back to
any previous level in the tree by simply placing the cursor on the
desired command and clicking the left or middle button.
The complete list of commands available and a brief summary of their
associated operations are given in Section 7.
4.4 Commands, Buttons, Switches, Options
For future reference in this manual, we call the items chosen from the
menu system commands and always show them in boldface print. When a
command is being executed, its operation usually requires initiation of
actions for the selection of parameter values or the initiation of local
subcommands. These are made possible through entities called buttons and
switches.
A button is an entity which has a name associated with it. It initiates an action when "selected" or "pressed", meaning when the cursor is placed on it and the left or middle mouse button is clicked. As an example, a button named COLOR is used often in 3DVIEWNIX while operations to render structures are being executed. When this button is selected, three scales are set up in the dialog window, one for each of red, green, and blue components. These scales are used to select the component colors that define the color of the structure that is being rendered.
A switch has a name as well as a sequence of states associated with it. The number of states is at least two. The display of a switch shows both its name and current state. When the switch is selected (meaning when the cursor is placed on it and the left or middle mouse button is pressed), it changes its state. If the left mouse button is used for selection, the state advances to the next state in the sequence. Selection via the middle mouse button causes the state to change to the previous state in the sequence. For the last state, the first state is considered to be the next state, and for the first, the last is considered to be the previous state. Again using the rendering example, suppose there are n structures in a structure system that is being rendered. 3DVIEWNIX uses two switches called OBJECT and STATUS to select the desired combination of structures for the display. OBJECT has n states called 1, 2,....,n. STATUS has two states called ON and OFF. By setting the state of OBJECT to the desired structure number and by setting its STATUS to ON, any combination of structures can be selected for rendering.
For future reference in this manual, and to distinguish from commands,
all actions and functionalities chosen via buttons and switches will be
referred to as options and will always be shown in an uppercase print.
Options are made available mainly in the panel area and in mouse window.
4.5 Scales
Selection of values of parameters, while a 3D imaging operation is being
executed, is done mostly via scales. These are displayed always in the
dialog window.
Scales in 3DVIEWNIX have a unique multiresolution design. The structure of the scale is illustrated in Figure 4.2.
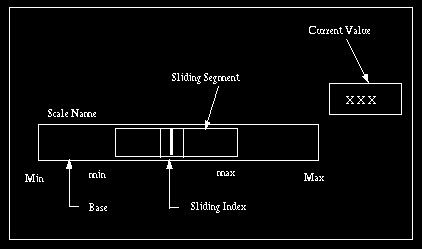
Fig 4.2: Multiresolution Scale and Its Components.
It consists of a low-resolution base on which a variable-resolution segment slides. There is a sliding index whose center indicates the value corresponding to the current position of the index on the scale. This value is constantly displayed at the upper-right corner of the scale. The length of the base represents a fixed range of values (of the parameter under question) from Min to Max. When the scale is initially displayed, the resolution of the sliding segment is set equal to that of the base, and hence, this segment is not displayed. At this point, we therefore see only the base and the sliding index. To set a value on the scale, the cursor should be first moved onto the scale and subsequently the left mouse button should be pressed. The index now gets latched to the mouse; as the mouse is moved horizontally, the index moves horizontally on the scale. Throughout the process of value selection, the mouse buttons have the following options associated with them:

Selection of UP (left button) causes the resolution of the sliding segment to increase and that of DOWN (middle button) causes the resolution to decrease. The minimum value of this resolution is always the resolution of the base. The highest resolution value and the number of distinct resolutions available depend on context. Whenever the resolution of the sliding segment exceeds that of the base, the segment appears in the display. It disappears when the two resolutions become equal. As the index is moved within the segment, the segment remains stationary until the index hits an end of the segment. When the latter happens, the segment also moves with the index. In the former case the value changes less rapidly than in the latter case. When the desired value is reached, DONE (right button) should be selected to leave the scale.
The multiresolution scale of 3DVIEWNIX is an effective, intuitively
simple solution to the conflicting requirements of compactness of space
and large dynamic range of values to be selected.
4.6 Tablets
Values of parameters or other text items can be specified via a widget
called tablet. When the value to be specified is precisely known or when
the range of the values of a parameter cannot be determined in advance,
tablets are more convenient than scales for this specification. Tablets
are also needed for specifying text items such as the name of an output
file.
A tablet consists of a rectangular area on which text or numeric values can be typed using the keyboard. Often the tablet is given a name to indicate its purpose. This becomes necessary when multiple tablets are to be used simultaneously. Sometimes default text items or numbers are displayed in the tablet which the user can accept or choose to change. To change or type text or values displayed in the tablet, position the cursor in the rectangle and click the left mouse button. A vertical line indicating the keyboard prompt then appears. Text/value can be now changed or typed in. When done, press the Return key of the keyboard to disable the tablet.
 User Manual
 Library Ref. Manual
 Tutorial
